Contents
- Getting Ready for Your New Device
- Moving Files to Cloud Storage
- Device and Software Inventory
- Equipment Label Template
- Setting up Your New Device
- Accessing Your Backed-Up Files
- Restoring Other Saved Information
Getting Ready for Your New Device
Before you take delivery of your new computer, you will need to set aside some time to prepare your current device for retirement. Follow this guide to ensure your files are backed up to reliable and secure cloud storage so you can get up and running quickly when you receive your new device. We’ll also take a brief inventory of any specialty applications or software that you use in your day to day work, any network printers you use, and take care of saving your Internet bookmarks.
NOTE: If you’d rather work with a hard copy, download the print-formatted PDF of these new PC setup instructions.
Good to Know
Which Version of Windows Are You Running?
You’ll need to know which version of Windows you are running on your current PC, just in case you have trouble completing any of these steps and need assistance. To find out which version of Windows your device is running, press the Windows logo key + R, type winver in the Open box, and then select OK. A box will pop up that tells you if you are running Windows 7 or Windows 10. Keep this in mind, and feel free to close that window.
What Is Your Current Device’s Name and Service Tag?
If you need help, you may need to provide your OIT technician with your computer’s name and service tag. We recommend you write these down someplace where you won’t lose them.
How to Find Your Computer Name
- Click on the Start button.
- Right-click on Computer.
- Select Properties.
- Under Computer name, domain, and workgroup settings you will find the computer name listed.
- Right-click on the Start button.
- In the menu that appears, click System.
- The System window will appear and display basic information about your computer, including its Computer name.
How to Find Your Service Tag
The service tag is a 7-character alphanumeric character code, and the express service code is a 10 to 11-digit code that is a numeric version of the Service Tag. OIT primarily uses the service tag rather than the express service code.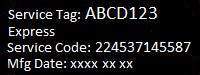
- On Dell Desktops, the Dell service tag ticker is probably located on the back of the computer case, but can also be located on the top or side of the system.
- On Dell Laptops, the Dell service tag sticker is on the bottom. Some models have a flap, covering the sticker.
Your Responsibilities
It is your responsibility to ensure your data is backed up properly prior to turning in your current device. OIT and eTech are not responsible for data loss, and cannot assist with data recovery once a hard drive has been securely erased. Your new PC will not be set up until you have confirmed all files have been transferred to the cloud or an external storage device, since no files will be moved while a technician is present.
Moving Files to Cloud Storage
UA’s Office of Information Technology offers two great options for cloud storage: UA Box and Microsoft OneDrive.
For the smoothest experience and deep integration with Microsoft 365 cloud features, OIT recommends using Microsoft OneDrive. You can also choose to save your files to an external storage device, like a USB drive or external hard drive.
Whichever cloud storage solution you choose, you can be assured that your files will be safe and securely protected by your myBama username and password, along with DUO two-factor authentication to ensure no one else can access your data.
About Microsoft OneDrive
 OneDrive is the intelligent files app for Microsoft 365 connecting you to all your work and school files so you can share and collaborate from anywhere, on any device, while protecting your work. With OneDrive you can
- Store, access, and discover your individual and shared work files in Microsoft 365, including Microsoft Teams and other Office apps, from all your devices. Your offline edits will automatically sync next time you connect.
- Work faster and smarter with anyone inside or outside your organization. Securely share files and work together in real time using Word, Excel, and PowerPoint across web, mobile, and desktop.
- Create, view, edit, and share files on the go with the OneDrive mobile app. Easily capture whiteboards and scan work receipts, business cards, and other paper documents for safekeeping.
- Back up and protect your files with OneDrive. You can easily recover files from accidental deletes or malicious attacks, and policies set by OIT Security help keep your information safe.
The process of backing up your files to OneDrive is relatively simple, but may vary slightly depending on what version of Windows your PC is running. This guide is designed to work for both Windows 7 and Windows 10, but if you have any issues, you can always contact the IT Service Desk for help at 205-348-5555 or itservicedesk@ua.edu.
Installing and Saving Files to OneDrive for Windows
- Install the Windows version of the OneDrive sync app.
- If you have Office 365 or Office 2016, you may already have the Microsoft OneDrive sync app. To check if it’s installed, click the Start button and search for OneDrive. Note: Do not use the OneDrive for Business app. It is no longer supported. If you do not see a program called “Microsoft OneDrive,” download and install the new OneDrive sync app.
- Open the OneDrive app. If you’re already signed in with your UA Microsoft Account, skip to Step 4 — If not, sign in using your UA email address (formatted myBamaUsername@ua.edu) and myBama password. Note: Never use a personal Microsoft account to back up University data.
- Follow the steps that appear on the screen until OneDrive Setup is finished. You can skip downloading the mobile app, if you’d like.
- In the notification area, at the far right of the taskbar, right-click the OneDrive blue cloud icon, and then click Settings. Note: You might need to select the Show hidden icons arrow next to the notification area to see the OneDrive icon.
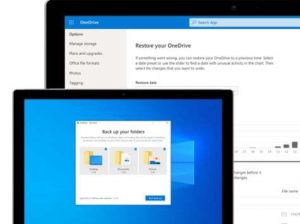
- In the dialog box that opens, navigate to the Backup tab. Click Manage Backup.
- Select Start backup (or in older versions of OneDrive, select Start protection).
- Be patient. It may take a moment for OneDrive to prepare to back up your data. When you see the message “OneDrive is starting to back up your files,” you can click the blue View Sync Progress button to see how it is going.
- If you have files outside of your Documents, Pictures, and Desktop folders that you want to move to your new PC, you will need to use Windows Explorer to manually move these files in to OneDrive.
- Press Windows key + E to open Windows Explorer and browse to the folders you want to move. Drag them to OneDrive – The University of Alabama in the left pane.
- Be sure to include any files that you want to keep. Your old device will be completely erased when it is turned in, so be thorough! Think of this as a time to get more organized and move files to a more secure and accessible storage method.
- If you want, you can further organize your synced files and folders by opening up your OneDrive – The University of Alabama folder. Create new folders, move things around, remove duplicates — whatever you need.
- You do not need to move files that are stored in a UA Departmental or Personal Network Share Drive (S: or H: Drive). These files are already backed up in the OIT Data Center.
- In the notification area, at the far right of the taskbar, hover over the OneDrive cloud icon to check the status of the files uploading to OneDrive. Please be patient — the syncing process can take quite a while, depending on the speed of your internet connection. If at any point your internet connection is interrupted, don’t worry! OneDrive will pick up where it left off when you get connected again. When you see the message “You’re all set — All files are in sync” and you are certain that you have moved all files you want to back up into OneDrive, you’re done! You can continue with other tasks while OneDrive works in the background.
About UA Box
Box is a service that provides cloud storage to students, faculty, and staff of The University of Alabama via box.ua.edu. Box is accessible on desktop and mobile devices around the world, and it is encrypted both in transit and storage.
Box is also useful for sharing and collaboration — folders and documents may be shared among users for distributed editing and viewing. Box has robust permissions settings, allowing collaborators to be viewers or editors, and it keeps revisions of documents so that your work is never lost.
- Download the latest version of the Box Drive app for Windows and install the application.
- When prompted, sign in to Box Drive with your UA Email Address and myBama Password.
- Click through the tour, paying attention to how Box Drive stores your files in the cloud and streams them on-demand to your PC.
- If you currently have the older Box Sync installed, you will be prompted to migrate to Box Drive. This will not affect your files in any way.
- When the setup process is complete, you will have a new Box folder shortcut on your Desktop and in the left pane of Windows Explorer.
- In this UA Box Folder, create a new folder named “Backup — Fall 2020”
- Open your new Backup — Fall 2020 folder and drag any files or folders you would like to transfer to your new PC into it.
- Be sure to include any files that you want to keep. Your old device will be completely erased when it is turned in, so be thorough! Think of this as a time to get more organized and move files to a more secure and accessible storage method.
- If you want, you can further organize your synced files and folders by opening up your Box folder. Create new folders, move things around, remove duplicates — whatever you need.
- You do not need to move files that are stored in a UA Departmental or Personal Network Share Drive (S: or H: Drive). These files are already backed up in the OIT Data Center.
- Allow Box Drive time to sync the files to the cloud. When your Backup — Fall 2020 folder has a white cloud icon visible, the process is complete.
- Please be patient — the syncing process can take quite a while, depending on the speed of your internet connection.
- If at any point your internet connection is interrupted, don’t worry! Box Drive will pick up where it left off when you get connected again.
- You can continue with this guide while Box Drive works in the background.
Device and Software Inventory
You and your PC have probably known each other for quite a while now, so it’s understandable if you’re a bit apprehensive about moving on to something new. These next steps will help you take a brief inventory of your current device configuration, which will make it easier to get started with your new device once you receive it. Think of it as a packing list of the printers, software, and other details that you’ll want to make sure you have with you when you move.
Finding Installed Printers
- In the notification area, at the far right of the taskbar, right-click the PrinterLogic icon with the green plus symbol on it. Note: You might need to select the Show hidden icons arrow next to the notification area to see the PrinterLogic icon.
- Click View Installed Printers in the menu that opens.
- A Control Panel window with a list of your installed printers will appear.
- You’ll now need to determine which printers are Local and which are Network Connected. Look at the printer’s name:
- If a printer has a name that starts with a building code and room number, like OO-C103-COPIER, it is a network printer.
- If a printer has a name that starts with its manufacturer and model, like HP LaserJet 1100 Series, it is a local printer.
- Write down the names of any network printers you find. We’ll use the list again later in this guide to find and add these printers to your new PC during setup.
- Close any open windows from this section.
Specialty Software
Your new PC will come with most of the software you need pre-installed, like Microsoft Office 365, Zoom Meetings, Adobe Acrobat Pro DC, and the Adobe Creative Cloud app. Your new PC will also have the latest versions of the top three web browsers for Windows — Microsoft Edge, Google Chrome, and Mozilla Firefox — along with virus protection and threat prevention software from OIT Security. However, we know that you may need more than what we provide in our base setup for new devices. Take some time now to go through the Start Menu on your current PC and look for programs and apps that you use in your day to day work, whether that be for teaching, research, or service.
Make notes about what you find for later. Keep in mind that you do not need to list every piece of software on your device — only the stuff that is not too common, or things that you may forget you needed! It’s also important to note that not all software that you currently use on your device may be compatible with your new one, and some software may no longer be offered by the University or your department.
Internet Bookmarks and Favorites
Many browsers now allow you to create an account so you can sync your bookmarks across different devices, which makes it easy to back up your bookmarks before moving to your new PC. You can also choose to save your bookmarks to a file without syncing, if you wish.
How to Save Your Internet Bookmarks or Favorites
Exporting Firefox Bookmarks by Syncing
- Open Firefox on your current PC. In the top right of the window, click on the User Profile icon and choose Sign in to Firefox.
- If you do not have an account, it will ask you to create one.
- During the creation of this account, it allows you to select what you want to sync. You can choose to sync only Bookmarks or have Firefox store and sync other data.
- Finish creating your account and leave Firefox open for a few minutes to complete the syncing process.
Export Firefox Bookmarks to a File Without Syncing
- Open Firefox on your current PC and press Control + Shift + B to open the Bookmarks Library.
- Click Import and Backup on the menu bar.
- Select Backup.
- Save the file as “My Bookmarks – Fall 2020”.
- Make sure to save this file in a safe place – we suggest saving it in the same location as the files you backed up earlier in this guide, like OneDrive or Box.
How to Export Chrome Bookmarks by Syncing
- Open Chrome on your current PC. In the top right of the window, click on the User Profile icon and choose Turn on sync.
- If you do not have a Google account, you can create one here and use your UA email address for the username. Otherwise, you can log in with any existing Gmail or Google account belonging to you.
- During Sync setup, you will ask you want you want to sync. If you only want to sync Bookmarks, select Customize Sync and make sure that only Bookmarks is checked.
- Click Confirm and leave Chrome open for a few minutes to complete the syncing process.
To Export Chrome Bookmarks to a File Without Syncing
- Click the Chrome menu button (three dots) on the top right.
- Select Bookmarks, then Bookmark Manager.
- At the top, click the menu button (three dots) and then Export Bookmarks.
- Save the file as “My Bookmarks – Fall 2020”.
- Make sure to save this file in a safe place – we suggest saving it in the same location as the files you backed up earlier in this guide, like OneDrive or Box.
To Export Internet Explorer Favorites to a File
- Start Internet Explorer.
- On the File menu, click Import and Export, and then click Next.
- Click Export Favorites and then click Next.
- Click Favorites and then click Next.
- Save the file as “My Bookmarks — Fall 2020”.
- Make sure to save this file in a safe place — we suggest saving it in the same location as the files you backed up earlier in this guide, like OneDrive or Box.
Equipment Label Template
When you have completed the previous steps in this guide and you are ready for an OIT Technician to deliver your new PC, please print out copies of the equipment label template and complete one for each item being returned to eTech; affix labels to items. There is no need to label your mouse, keyboard, or cables. You will also need to notify your technician that you are ready by responding to the email thread with your device install ticket number in the subject line.
The label is also found on page 9 of the PDF version of these instructions.
Setting Up Your New Device
Now that your new device has been delivered, it’s time to get it ready for you to use. We’ll start by getting your user account created, then move on to getting the files you backed up in the first section of this guide where you can work with them. We’ll also use look back at the notes you made about your network printers and software to further personalize your PC, so you’ll be back to work in no time.
Getting Started with Your New PC
Connect to the UA Campus Network
Your PC must be connected to the UA campus network to complete most of the steps in this section.
- If your PC is a desktop, the technician who delivered your device has already connected it to our network with an ethernet cable.
- If your new device is a laptop or Windows tablet and you do not have a way of connecting it to a wired connection, get connected to eduroam Wi-Fi by following these steps:
- Click or tap the Wi-Fi icon in the bottom right of the Windows lock screen.
- Choose eduroam in the list.
- Enter your UA email address (formatted myBamaUsername@ua.edu) and your password.
- You may be asked if you are sure you want to continue connecting. If so, choose “Connect.
- When you see that the eduroam network is Connected and Secured, you are ready to move on.
If you have trouble connecting to eduroam, contact the IT Service Desk at 205-348-5555 or itservicedesk@ua.edu.
Log In to Windows for the First Time
To log in to your computer for the first time, click “other user” in the bottom left corner of the Windows login screen. In the boxes that appear, enter your UA email address (formatted myBamaUsername@ua.edu) and your myBama password. Press enter or click the arrow to log in.
Your user account on your new PC will automatically sync information with myBama, keeping your password consistent across your PC account, myBama, and Microsoft 365 email. You can change or recover your myBama ID password on the Password Change page on OIT’s website.
After logging in, it may take a few moments for Windows to create your user account and get your desktop ready for you.
Set Up Microsoft Office and Office 365 Email
To set up your Microsoft 365 account for access to your email and other Microsoft Office 365 apps, open the start menu and click on the orange Office icon. This app is your gateway to the Microsoft 365 cloud — think of it as your new digital office! You can then sign in with your UA email address (formatted myBamaUsername@ua.edu) and your myBama password.
To access Office 365 email with the Outlook application, open Outlook with the shortcut on your Desktop or by finding Outlook in your Start Menu. You may be prompted to enter your UA Email Address and myBama password again, or simply verify your information.
To access Office 365 email with Outlook on the Web (the new version of webmail), open a web browser and go to outlook.office.com, then sign in with your UA email address (formatted myBamaUsername@ua.edu) and your myBama password.
Choose Your Default Web Browser
Your new PC is set to use the newest version of Microsoft Edge by default. If you prefer, you can change the default web browser to Google Chrome or Firefox, both of which come pre-installed on your device.
- Select the Start button, and then type Default apps.
- In the search results, select Default apps.
- Under Web browser, select the browser currently listed, and then select the browser that you prefer from the list.
Activate Adobe Applications
For detailed information and FAQs about Adobe apps at UA, visit the OIT website.
If you have never activated your Adobe account in myBama, visit the myBama Tech Tab and click the account creation link under Software Spotlight to activate your Adobe Creative Cloud account, then follow the instructions below:
- Wait just a bit for a message letting you know that your account creation was successful.
- Next, open an Adobe application, like Acrobat DC or Creative Cloud Desktop. When prompted to sign in, enter your UA email address (including @ua.edu) and press the [ENTER] key.
- You will then be redirected to a familiar myBama Single Sign On screen, where you may sign in with your myBama credentials to activate your license.
Accessing Your Backed-Up Files
If you backed up your files to a cloud service like Microsoft OneDrive or UA Box, follow the steps in this section to access them on your new PC.
- Microsoft OneDrive is part of Office 365 and has been pre-installed on your new computer. Select the Start button, search for “OneDrive,” and then open the OneDrive app.
- You should see the OneDrive setup window. Sign in to OneDrive with your UA Email Address (formatted myBamaUsername@ua.edu) and your myBama password. You may already be signed in to OneDrive if you have already completed the Set Up Microsoft Office step earlier in this guide.
- Click through the tutorial, if it appears, paying attention to these key points:
- On the This Is Your OneDrive Folder screen, select Next to accept the default folder location for your OneDrive files. If you want to change the folder location, select Change location – this is the best time to make this change.
- On the All Your Files, Ready and On-Demand screen, you’ll see how files are marked to show them as online-only, locally available, or always available. Files On-Demand helps you access all your files in OneDrive without having to download all of them and use storage space on your Windows device. Select Next.
- In the notification area, at the far right of the taskbar, right-click the OneDrive blue cloud icon, and then click Settings. Note: You might need to select the Show hidden icons arrow next to the notification area to see the OneDrive icon.
- In the dialog box that opens, navigate to the Backup tab. Click Manage Backup.
- Select Start backup.
- If you have files outside of your Documents, Pictures, and Desktop folders that you manually backed up to OneDrive, you can find them using File Explorer by opening your OneDrive – The University of Alabama folder in the left pane.
- In the notification area, at the far right of the taskbar, hover over the OneDrive cloud icon to check the status of the files uploading to OneDrive. Please be patient — the syncing process can take quite a while, depending on the speed of your internet connection. If at any point your internet connection is interrupted, don’t worry! OneDrive will pick up where it left off when you get connected again. When you see the message “You’re all set – All files are in sync” and you are certain that you have moved all files you want to back up into OneDrive, you’re done! You can continue with this guide while OneDrive works in the background.
- Download the latest version of the Box Drive app for Windows and install the application.
- When prompted, sign in to Box Drive with your UA email address and myBama password.
- Click through the tour, paying attention to how Box Drive stores your files in the cloud and streams them on-demand to your PC.
- When the setup process is complete, you will have a new Box folder shortcut on your desktop and in the left pane of file explorer.
- Allow Box Drive time to sync the files from the cloud. When all of the folders within the Box folder have a white cloud icon visible, the process is complete.
- Open your Box Folder, and locate the folder you created earlier in this guide called “Backup — Fall 2020.”
- Open your Backup — Fall 2020 folder and drag any files or folders you would like to transfer to your new PC out of it to their appropriate locations on your new computer.
- Please be patient — the download process can take quite a while, depending on the speed of your internet connection.
- You can move on to other tasks while Box Drive works in the background.
Restoring Other Saved Information
Internet Bookmarks
If You Chose to Sync Your Bookmarks
- Open Firefox on your current PC. In the top right of the window, click on the User Profile icon and choose Sign in to Firefox.
- Sign in using the account you used to sync your browser data previously in this guide. Your data will sync to your new PC automatically.
If You Backed up Your Bookmarks to a File
- Open Firefox on your new PC and press Control + Shift + B to open the Bookmarks Library.
- Click Import and Backup on the menu bar.
- Select Restore.
- Select the backup file from which you want to restore by clicking Choose file…
If You Chose to Sync Your Bookmarks
- Open Chrome on your new PC. In the top right of the window, click on the User Profile icon and choose Turn on sync…
- Log in to Chrome using the account you used to sync your browser data previously in this guide.
- During Sync setup, you will ask you want you want to sync. If you only want to sync Bookmarks, select Customize Sync and make sure that only Bookmarks is checked.
- Click Confirm and leave Chrome open for a few minutes to complete the syncing process.
If You Backed up Your Bookmarks to a File
- Click the Chrome menu button (three dots) on the top right.
- Select Bookmarks, then Import Bookmarks and Settings.
- From the drop-down menu, select Bookmarks HTML file.
- Select Choose File, then locate the backup file from which you want to restore.
- If you haven’t created any bookmarks in Chrome on your new PC, the bookmarks show up in the bookmarks bar.
- If you already have bookmarks in Chrome on your new PC, the bookmarks are in a new folder labeled “Imported.”
Instructions for Microsoft Edge (Importing from Internet Explorer)
When you open Microsoft Edge, you’ll be asked if you want to sync your browser data to your UA-provided Microsoft account. We recommend syncing your data to ensure your favorites are up to date wherever you need them.
- Open Microsoft Edge and click on the menu button (three dots).
- Select Favorites > Import.
- In the Import from menu, select Favorites or bookmarks HTML file.
- Select Choose file and find the file you created when you backed up your favorites from Internet Explorer.
- Select the file you want to use and select Open.
- When the import is complete, you’ll see a notification. Select Done.
- Find your imported favorites in a folder on the Favorites bar. The folder may be called Imported.
Printers
Local (USB-Connected) Printers
In most cases, all you have to do to set up a local printer is to connect it to your PC. Simply plug the USB cable from your printer into an available USB port on your PC and turn the printer on. Refer to your printer manufacturer’s documentation for more information, if needed.
Network Printers
This section will walk you through adding network-connected printers to your new PC with the PrinterLogic website. You will need to refer to the network printer notes you made while preparing for your new PC’s installation.
- On your new PC, open a web browser (we recommend Google Chrome for installing printers) and navigate to printlogic.ua.edu.
- If your device is connected to the UA Campus Network with an ethernet cable, the PrinterLogic site should automatically detect your building and navigate to the correct folder of printers. If it does not, or if you’re connected via wireless, find the building where the printer you want to add is located in the list to the left and click on it to open the folder.
- Locate the printer you want to add.
- Verify that the name of the printer is correct, then click the printer’s name to install it.
- Once the dialog box that appears indicates installation is complete, repeat steps 2-3 for any additional network printers you need.
Software
Instructions for installing most UA-provided software are provided in the OIT Software Catalog. Refer to the software notes you made while preparing for your new PC’s installation. If you need assistance installing any UA-supported software, contact the IT Service Desk at 205-348-5555 or itservicedesk@ua.edu. OIT Technicians cannot install software not supported by the University. For assistance with non-UA licensed applications, contact the software vendor’s support team.
Check for Updates
Because it may have been a few days since your new PC was initially provisioned by OIT, it is important to check for and run Windows Updates after getting settled in.
- Select the Start button, and then go to Settings > Update & Security > Windows Update.
- Click Check for updates to download and install the latest updates. Your PC may ask you to schedule a restart after it updates to finish up.
Conclusion
That’s it! If you need additional assistance with anything covered in this guide, or if you have further questions, please contact the IT Service Desk at 205-348-5555 or itservicedesk@ua.edu.